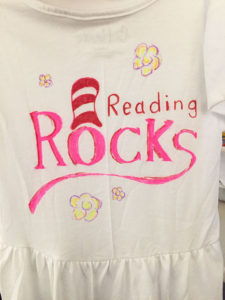
Did you ever have those times when you’re looking for something but you can’t find it? Emma had a Dr. Seuss Day at school during Read Across America week. She loves Dr. Seuss, so of course we needed to wear something special that day. The only shirt she had in her closet was 2 years old and there’s no way she could fit in it. I had about 5 days to find a new shirt that my fashionista daughter would approve of. And just incase for those parents out there, Dr. Seuss Day is always March 2nd in celebration of his birthday. You’ve been forewarned 🙂 Time was ticking fast. I visited different stores with no luck except baby clothes with Dr. Seuss. Well, that’s not going to work. Than I looked online and everything I thought Emma would like was no longer available. Ugh, of course they weren’t – that would be too easy. I was telling one of my friends about trying to find something and she said, “why don’t you just make one yourself?” Ah ha… I never thought of that. So I went from trying to find a shirt to creating one for her. So here is what I came up with and what you will need.

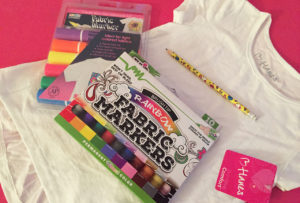
Supplies:
- Plain t-shirt (I got one with a little ruffle detail at the bottom from Walmart for $5)
- Fabric markers
- Pencil/charcoal pencil
- Inspiration images
- Foamcore/cardboard (I got mine at the dollar store)
- Tape/pins
Step 1: Cut your foamcore to fit inside the shirt.
Step 2: Slide the foamcore inside the shirt. Pull the shirt tight around your foamcore so when you draw and color, the shirt will stay flat. You can hold the shirt by taping the back together or pinning it. Smooth out any wrinkles on the front.
Step 3: Take your charcoal pencil and draw your design on the shirt. It’ll be easy to erase afterwards or will wash out. If you don’t want to draw, you can trace carbon paper onto the shirt as well with your design.
Step 4: Now choose your colors and start coloring. You’ll be amazed how easy the markers work. Pro Mom Tip: If you are going to outline your drawing, color it in first and outline second. It shows up so much better.
Step 5: If you want to also draw on the other side of the shirt, you only have to wait about 30 minutes for the ink to set in. If your vision was only to design one side, then you can skip this and go to step 6. Carefully remove the tap or pins from back, flip your shirt over while holding the foamcore inside and try to wrap your shirt around holding it with tape or pins again. This time you just want to make sure to not put tape or pins on your design. Once your good, smooth out the wrinkles again and repeat steps 3 and 4.
Step 6: Let it dry for 24 hours (or whatever the fabric markers directions say). Remove the tape or pins but keep the foamcore for extra support while drying. If you do decide to do both sides than you can always use a binder clip and attach it to a wire hanger and the foamcore at the neckline to help hang it up for 24 hours.
Step 7: The fabric markers I bought said to wash the shirt before wearing. We didn’t have time, so Emma wore hers to school the next day without washing it and it held up great.


Yah, all done! Emma was extremely happy with her new shirt and was definitely born to stand out as herself. The colors were nice and vibrant and she received plenty of compliments. She still likes to wear her shirt often. After a year of washes, it still looks good but just a little more faded. She’ll be wearing it again this year for Dr. Seuss Day.

Not only is this a great project for you to express your creativity, but it’s also a fun project for the kids to do. With the markers, they can design their own shirts, hats, socks, shoes or even bags. It would be a lot of fun for all kids and adults to express their creativity. Let me know what fun designs you created.
Love,
Jeannie
Leave a Reply