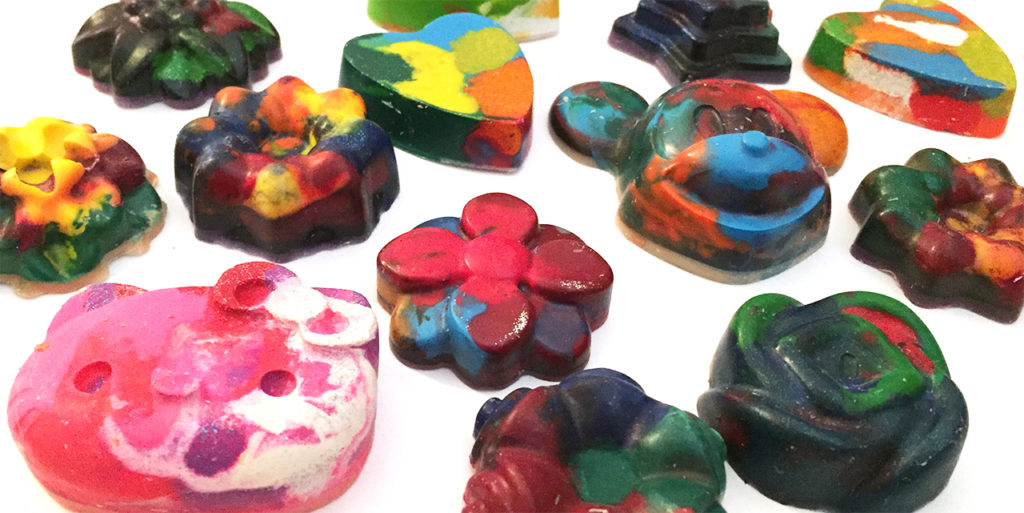
If you’re like me, you get tons of crayons that get broken or become stubs that your kid can barely hold. Or you start collecting endless crayons from restaurants that end up at the bottom of your purse because you forget about them. Here’s a great creative way to put those broken, stubby and extra crayons to good use. Make your own crayons in fun shapes and sizes. To my surprise, it’s actually pretty easy and now my daughter Emma and I have made many different crayons throughout the years to give away to kids and adults. This is an easy and cute project you can do with your child (great for all ages) and it’s so much fun. We’re creating some new crayons for Emma’s Valentine’s Day party to give to all her classmates and teachers. Here are the easy steps to make your own crayons in the shape of your choice.
Supplies:
- Crayola crayons – if you want new crayons, here’s a party pack
- Bowl of warm water – to put crayons in
- Silicone mold (any shape) – make sure it’s one you won’t use for food later
- Cookie sheet – to hold the silicone mold
- Foil – if needed to help support your mold
Let’s get started. The kids can help with all the steps you feel comfortable with. Emma helped with everything except the oven.
 1. Gather all your crayons and separate them into two piles, wrapped and unwrapped. Any crayons with wrappers, place them in the bowl of warm water and wait about 10 minutes. You’ll start seeing the labels peeling off the crayons.
2. Pull the crayons out and throw away the wrappers. Dry everything off and add them to the unwrapped pile. (This works the best with Crayola crayons because of the glue they use) We created an assembly line for this process so Emma knew exactly what to do.
3. Preheat the oven to 250F.
4. Now it’s time to break all the bigger crayons into smaller pieces. If you have specific colors you want together then separate them before they become smaller pieces. Emma and I always just wing it, so we put it all in a big bowl. The crayons need to be broken small enough to fit several into the mold so when they melt, you’ll have all the blend of colors.
5. Now for the fun part, deciding on what colors you want to put together. Just pile in the broken crayon into each shape to the top. Pro Mom Tip: If you want your crayons to be more colorful, don’t put a lot of dark colors together. Mix in bright colors to balance it out.
6. Once all the shapes are filled, place your silicone mold on top of a cookie sheet for easy moving. If your mold doesn’t feel sturdy on sides, crumble up some foil and wrap around the mold to help hold it upright.
7. Place on the middle rack of your oven. Bake for 20 to 30 minutes, or until the wax has melted. Thicker and larger shapes will require more time. Make sure to keep an eye on them. If it looks like your shape isn’t filled up as much as you wanted once the crayons start melting, you can always add more. Pull the over rack out, add a few more pieces of broken crayons to fill the shapes up more and put them back in the oven.
8. Once the crayons are all melted, remove your cookie sheet and mold from the oven. Let the crayons cool and harden sufficiently. They will be easy to remove from the silicone mold once they are completely hardened. Pop them out, and they are ready to color.
You and the kids can have fun with them now or give them away as gifts or party favors. We like to keep some for ourselves and give the rest away. These are some of our latest crayons for Emma’s Valentine’s day party. Hello Kitty for the teachers and hearts for her classmates. Hope you all enjoy coloring!
Love,
Jeannie
Side Note: Here’s example of some ways I packaged the crayons. Both ideas are using 3×4 inch self sealing bags. You can either print your own cards (2.75 x 3.75 inches) to fit inside the bag. This year we actually purchase $2 cards with tattoos and put those in the bags with the crayons on the back. They turned out pretty cute and easy to do.

Leave a Reply